

Gearing Up For Gardening 3/25/2011
There is something special about eating the fruits, and vegetables, of your labors. With Spring officially here, despite adverse weather conditions, now is the time to get your seeds going and I am going to show you how.
First of all get some scratch paper. I use the unprinted side of paper. Now, do a rough drawing of the area you have designated to your gardening efforts. For me, I am going to have a 1st produce garden and then around back, a 2nd produce garden. Plus lining the back of my long home will be a few of the bigger plants, an area on the front of my home for herbs as well as 3 areas up front for flowers and other pretty things. I love living more rural in a bigger plot of property!
You can do your sketches to accurate measurements something that might be useful if this is your first time growing certain plants. I however am aware of my plants' specs. Example, I know my blood red corn needs to be planted in a double row so they can easy cross pollinate each other.
Now, somewhere on that paper in some spare space, write down all the things you want to grow. You will quickly see that what you want and what you have room for plus can physically tend to are very different. Now is your first pruning. Remove from the list things you can live without. If you are a little new to gardening, try sticking with the tried and true easy to grow things such as melons and squashes. I still grow these things. Yummy scrummy!
Once you have figured out what you want to grow and using the internet have figured out if you have enough room for it all (growing space etc.) now is the time to get your seeds.
For me, I get seeds from produce (grocery store or previously grown items) as well as buying seed packets.
This year I am growing:
Herbs
Chives 3
Oregano 2
Sweet Basil 1
Cilantro 1
Dill 1
Flowers
Marigolds (natural pest repellent) 10
Snap Dragons 4
Miniature Lilies 3
Bachelor Buttons 3
Morning Glory (pink to go around porch posts and tree) 4
Morning Glory (purple to go around porch posts & tree) 4
Miniature Roses 3
Vegetables
Turnip 4
Summer Squash 3
Butternut Squash 3
Black Squash 3
Summer Squash 3
Sweet Corn 8
Jack-O'-Lantern 1
Sugar Pumpkin 1
Onion (natural pest repellent) 14
Cherry Tomatoes 2
Variety bell peppers 3
Fruit
Honeydew
Strawberries
Now, this all sounds like a lot. But, I assure you I am not growing a full crop of each one. See the number after the name of the item? That is how many, in total, I am growing. I made the mistake last year of forgetting how prolific squashes were so I have cut back.
With all that done, we get onto the actual quick germinating of seeds, the fun part. So, grab some plasticware (metal is not good for this) that you won't be needing for a few weeks and a stack of paper towels/paper napkins/recycled disposable paper.
Step 1
Ensuring your plasticware is clean and dry, grab your paper towel and wet it. I find folding it down into a 3x3 square then wetting it helps.
Step 2
This is so important-SQUEEZE the extra water out of your paper towel. You are going for a damp paper product. Not wet. Don't want to rot your poor seedlings.
Step 3
Gently open the damp paper towel up and then place down into the bottom of your plasticware. Doesn't matter if the damp paper towel goes up the sides or they overlap, we are looking for a total bottom covered.
Step 4
Dry your hands and then get a hold of your seeds. Place then onto the bottom of the container, on top of the damp paper towels. Be sure to give them a few inches around of space for when they sprout so they have room. Also, add one more seed if you are unsure of the validity of your seeds. Sometimes seeds are dead and will not germinate, this will ensure you get the number you want.
Step 5
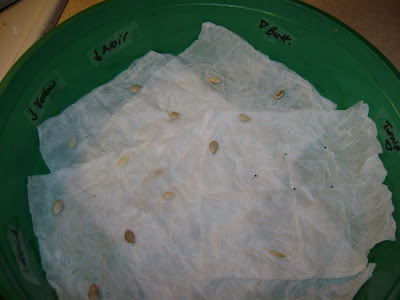
Label each seed section. I use regular sticky tape that I write on with a permanent marker so I can remove the label when I am done germinating. See the pretty picture below?

Here is my plastic Xmas Cookie container just to show you can use round as well. The triangles and arrows indicate which way the seeds for the label are.
Step 6
Repeat Steps 1 and 2. Then open up your damp paper towel and place gently over the seeds as seen below.

Step 7
Cover your plasticware with a tight-fitting lid. Ideally the lid that came with the bottom. If not, get some plastic wrap and seal it up.
Step 8
Place all your ready to germinate seeded plasticware in a dark place, of average temperature. I have mine in a corner of my bedroom under a towel as I reused some takeout plasticware that are clear.
Step 9
Leave the seeds alone at least a week before peeking at Mother Nature's beauty. Then check every few days until your seeds have sprouted are big enough to be moved into some soil. They will let you know, particularly squashes and morning glories. They will be struggling to get out of the plasticware!
Step 10
Move your sprouts into some soil. For this method I do recommend those seedling flats with a bit of soil and keeping indoors until all threat of frost is gone and your seedlings can survive in the cruel world outdoors.
I hope this has helped some of you get started in gardening.
Remember, you can grow produce at home, even if you live in an apartment. You just need to dedicated the space to it.
Things I have grown on balconies/apartments/containers are: Watermelon, Corn, Squash, Tomatoes, Potatoes, Strawberries, Miniature Citrus Trees, Green Beans, Peas and Sweet Potatoes.
If space is limited, just figure out what you love the most and want to try your hand at.
Finally, plants are a bit like kids. They need daily attendance. They need to be watered, weeded and tended. If you do as I do and refuse to poison/kill rabbits, beetles, and other garden pests, then you will have an added expense/time/effort of some raised beds or fencing plus mulch! I can not tell you how important mulch is to help reduce your water footprint, time and effort. And those paper towels you used to germinate the seeds? Tear them up very small as they can be composted.
More on gardening in a few weeks as the season gets going. Until then, feel free to tell the rest of us about your garden preparations, if this guide helped you, suggestions, etc. by commenting below!
First of all get some scratch paper. I use the unprinted side of paper. Now, do a rough drawing of the area you have designated to your gardening efforts. For me, I am going to have a 1st produce garden and then around back, a 2nd produce garden. Plus lining the back of my long home will be a few of the bigger plants, an area on the front of my home for herbs as well as 3 areas up front for flowers and other pretty things. I love living more rural in a bigger plot of property!
You can do your sketches to accurate measurements something that might be useful if this is your first time growing certain plants. I however am aware of my plants' specs. Example, I know my blood red corn needs to be planted in a double row so they can easy cross pollinate each other.
Now, somewhere on that paper in some spare space, write down all the things you want to grow. You will quickly see that what you want and what you have room for plus can physically tend to are very different. Now is your first pruning. Remove from the list things you can live without. If you are a little new to gardening, try sticking with the tried and true easy to grow things such as melons and squashes. I still grow these things. Yummy scrummy!
Once you have figured out what you want to grow and using the internet have figured out if you have enough room for it all (growing space etc.) now is the time to get your seeds.
For me, I get seeds from produce (grocery store or previously grown items) as well as buying seed packets.
This year I am growing:
Herbs
Chives 3
Oregano 2
Sweet Basil 1
Cilantro 1
Dill 1
Flowers
Marigolds (natural pest repellent) 10
Snap Dragons 4
Miniature Lilies 3
Bachelor Buttons 3
Morning Glory (pink to go around porch posts and tree) 4
Morning Glory (purple to go around porch posts & tree) 4
Miniature Roses 3
Vegetables
Turnip 4
Summer Squash 3
Butternut Squash 3
Black Squash 3
Summer Squash 3
Sweet Corn 8
Jack-O'-Lantern 1
Sugar Pumpkin 1
Onion (natural pest repellent) 14
Cherry Tomatoes 2
Variety bell peppers 3
Fruit
Honeydew
Strawberries
Now, this all sounds like a lot. But, I assure you I am not growing a full crop of each one. See the number after the name of the item? That is how many, in total, I am growing. I made the mistake last year of forgetting how prolific squashes were so I have cut back.
With all that done, we get onto the actual quick germinating of seeds, the fun part. So, grab some plasticware (metal is not good for this) that you won't be needing for a few weeks and a stack of paper towels/paper napkins/recycled disposable paper.
Step 1
Ensuring your plasticware is clean and dry, grab your paper towel and wet it. I find folding it down into a 3x3 square then wetting it helps.
Step 2
This is so important-SQUEEZE the extra water out of your paper towel. You are going for a damp paper product. Not wet. Don't want to rot your poor seedlings.
Step 3
Gently open the damp paper towel up and then place down into the bottom of your plasticware. Doesn't matter if the damp paper towel goes up the sides or they overlap, we are looking for a total bottom covered.
Step 4
Dry your hands and then get a hold of your seeds. Place then onto the bottom of the container, on top of the damp paper towels. Be sure to give them a few inches around of space for when they sprout so they have room. Also, add one more seed if you are unsure of the validity of your seeds. Sometimes seeds are dead and will not germinate, this will ensure you get the number you want.
Step 5
Label each seed section. I use regular sticky tape that I write on with a permanent marker so I can remove the label when I am done germinating. See the pretty picture below?
Here is my plastic Xmas Cookie container just to show you can use round as well. The triangles and arrows indicate which way the seeds for the label are.
Step 6
Repeat Steps 1 and 2. Then open up your damp paper towel and place gently over the seeds as seen below.
Step 7
Cover your plasticware with a tight-fitting lid. Ideally the lid that came with the bottom. If not, get some plastic wrap and seal it up.
Step 8
Place all your ready to germinate seeded plasticware in a dark place, of average temperature. I have mine in a corner of my bedroom under a towel as I reused some takeout plasticware that are clear.
Step 9
Leave the seeds alone at least a week before peeking at Mother Nature's beauty. Then check every few days until your seeds have sprouted are big enough to be moved into some soil. They will let you know, particularly squashes and morning glories. They will be struggling to get out of the plasticware!
Step 10
Move your sprouts into some soil. For this method I do recommend those seedling flats with a bit of soil and keeping indoors until all threat of frost is gone and your seedlings can survive in the cruel world outdoors.
I hope this has helped some of you get started in gardening.
Remember, you can grow produce at home, even if you live in an apartment. You just need to dedicated the space to it.
Things I have grown on balconies/apartments/containers are: Watermelon, Corn, Squash, Tomatoes, Potatoes, Strawberries, Miniature Citrus Trees, Green Beans, Peas and Sweet Potatoes.
If space is limited, just figure out what you love the most and want to try your hand at.
Finally, plants are a bit like kids. They need daily attendance. They need to be watered, weeded and tended. If you do as I do and refuse to poison/kill rabbits, beetles, and other garden pests, then you will have an added expense/time/effort of some raised beds or fencing plus mulch! I can not tell you how important mulch is to help reduce your water footprint, time and effort. And those paper towels you used to germinate the seeds? Tear them up very small as they can be composted.
More on gardening in a few weeks as the season gets going. Until then, feel free to tell the rest of us about your garden preparations, if this guide helped you, suggestions, etc. by commenting below!
Happy gardening!


We've planted seeds recently for our garden this summer too. You have been nominated for the Stylish Blogger Award! Find out more here: http://thywordisalamptomyfeet.blogspot.com/2011/03/stylish-blogger-award.html
ReplyDeleteThank you Jill!
ReplyDelete